

Sub-Total: £0.00
Pond Lighting. What you need to know.
10 min read
Ponds are beautiful bits of landscape and nature. We enjoy being near them. How they look, sound, and smell can all add a certain something to a garden. The element that is often missed out initially is pond lighting.
Lighting can make all the difference to your pond. Allowing you to enjoy it night and day, providing some extra security to prevent any splashy accidents, and giving it a real wow factor.
Our guide to pond lighting will take you through the following steps;
- When to plan in your lighting
- The physical fitting and landscaping of your pond lights
- Where to put your pond lights
- General hints and tips
Throughout this article we will feature some photographs of incredible lighting setups. There have all been carried out by an American business called Utah Lights. Check out their site here for more inspiration.
When should I consider pond lighting? #
In an ideal world your pond lighting should be part of your project planning from the start. We’re not silly, though, we know that lighting your pond can be an element of your project you’re happy to bolt on at a later stage once the pond has established. Oh, and once your wallet has recovered a bit!
Pond lighting suits most ponds although if you’re the proud owner of a small bog or ‘nature pond’ then perhaps you’d prefer the more ‘authentic’ feel. Also, lights through murky water just highlight murky water! Wonderful for tadpoles – not great for much else.
Landscaping and fitting your pond lights #
If it’s a ‘new build’ #
Consider how your landscape is going to change. If you’re planting bushes and tress don’t put lighting in behind them as you’ll just have to move it later.
You’ll likely want a bit of freedom to move some bits and pieces around once it has started coming together so make sure you play around with your placements on paper before burying any wires!
You will want your pond lighting to be easy to access, repair, and maintain. Don’t get trigger happy and start wiring lights under heavy rocks, foaming or siliconing everything in place, and then burying everything without so much as an ‘X’ marks the spot.
For deeper underwater light fittings it’s a wise idea to leave a couple of wraps of lead on the body of the unit itself. This leaves you with some slack to play with in a few years when you need to start replacing bulbs. You can pull out the light unit, play out the slack to get it above water level, then do what you need to do. This saves draining your whole pond to replace a bulb.
Use stiff piping to carry your wires around rather than just burying them. It’ll last longer and may prevent an over-enthusiastic spade thrust causing problems! Also remember that (unless you’re planning on wiring every connector and plug manually) multi-coloured lighting will often have larger units you’ll have to pass through them.
Finally, once everything is in place take a quick video of each light, how it’s fixed into place, and where the connections are. That way, when something goes pop (and it will eventually) you won’t have to spend ages scrabbling around in mud trying to find your connectors. You’ll have something that tells you exactly what is where. You may feel daft roaming around your garden pointing and saying things like ‘this light is here and has a connector behind this rock’ but it may well save you an awful lot of faff down the line.
If it’s a ‘bolt on’ #
If your pond lighting is an addition or an afterthought it might make life much easier. Or…it could be much harder and require lots of extra prep work. Like draining a stocked pond for a few days. It all depends on what kind of lighting you want for your pond.
Think about how light falls on your pond and garden at the moment and which bits you want to try and emulate. Then think about spots you want to highlight that may not get natural light. This would normally be under waterfalls or water features, under the water surface itself or, more generally, any light source pointing upwards. Natural light comes from the sun and reflections so it very rarely travels up.
Figure out how best to hide your wiring and what lights are going to work best with your existing environment. Similarly to the section above, you want your pond lighting in places that lend themselves to easy maintenance and replacement. Finding the balance between tastefully concealed wiring and easily accessed lighting can be a challenge but it’s all part of the fun.
Where to put your pond lighting. #
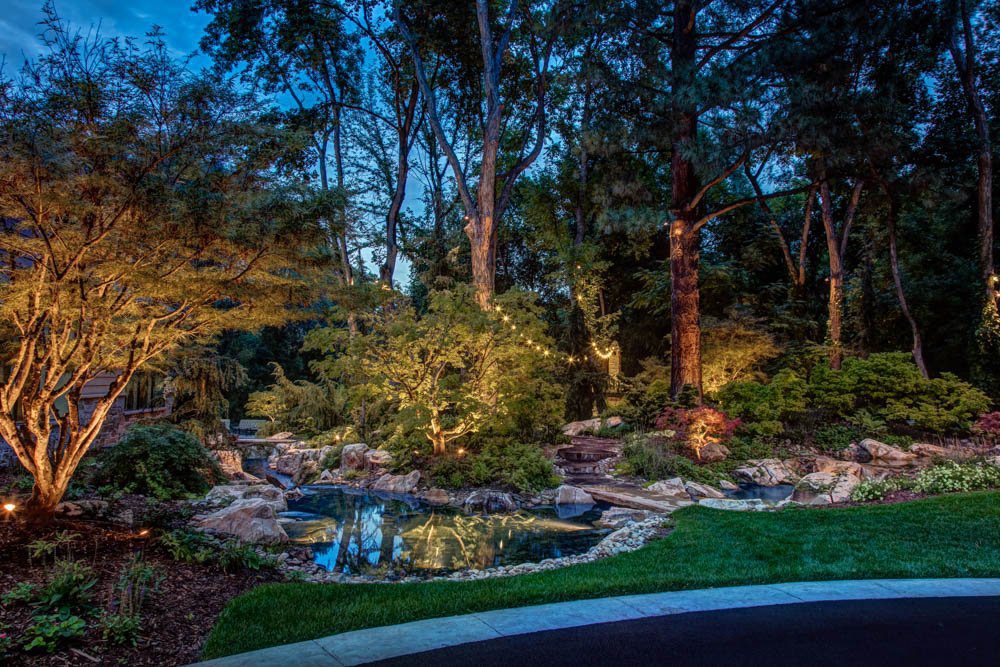
Pond lighting – uplights #

Lights installed just above the water’s surface, usually at the edge of your pool or pond. Professional uplight installations will often be placed behind foliage or between other decoration to hide the physical fittings.
Uplighting works particularly well if you have a lot of tall grasses, reeds, or trees around your feature. Similarly it can be used to show off statuesque plants or water features in your set up. Trees will also often look sculptural in this lighting.
This style of lighting can also blur the lines nicely between feature and the rest of your garden or environment. Lights used to pick out a pathway can merge into the pond uplighting to show where the edge of the water starts – useful if you have children or pets to think about. Or even just to prevent yourself falling in! On top of this uplighting will give lots of pretty surface reflections.
If you have a waterfall in your pond then directing uplights at where the waterfall hits the surface of your pond or pool will catch the bubbles and highlight the movement of the water. It can be a particularly striking effect.
For some more ideas around waterfalls and water features check out our article on those here.
Pond lighting – Downlights #
The most natural way to light a water feature or pond is by placing pond lights above it. Fixing a few key downlights on buildings, posts, or trees can transform your space.
It’s key not to overdo it with downlighting. You’re not trying to emulate midday sun in August. Apart from anything else it can start to interfere with your plants, pets, and local wildlife if you have a garden that is, to their minds, going through a perpetual day.
Another advantage to this style of lighting is longevity. As none of your lighting or wiring is in contact with water (other than rain) they’ll last a lot longer and be much easier to maintain. They’re also easier to fit if you already have lighting outside as you can run them off the system that is already in place.
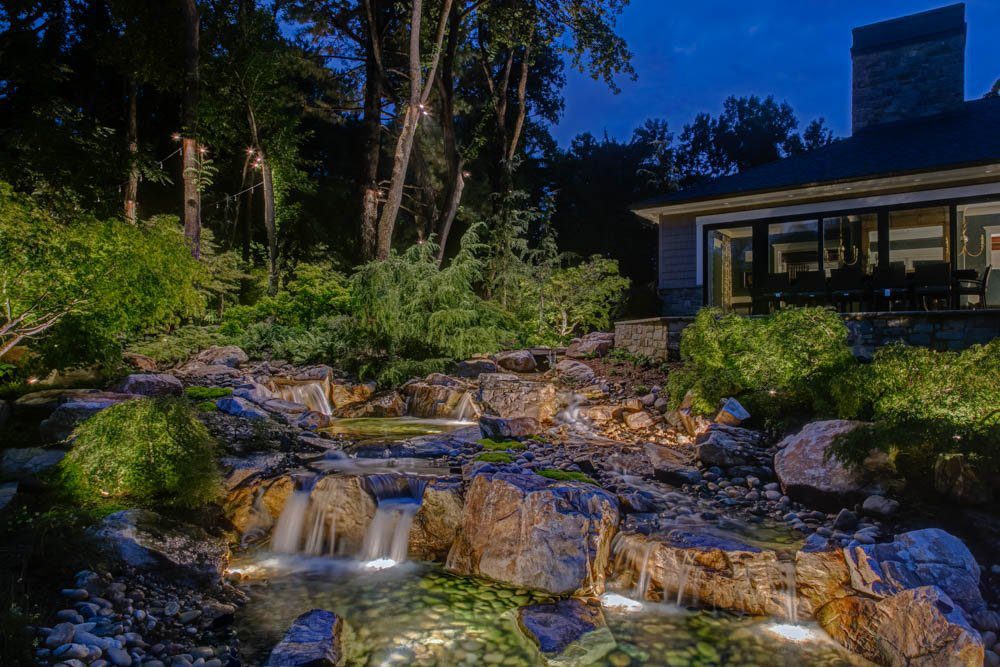
Pond Lighting – Submersible Lights #
Submersible lights carry the largest risk in terms of maintenance and installation. Obviously water and electricity don’t mix. Or, rather, they mix extremely well provided you’re either the electricity or the water – if you’re a third party in that mix you’re in a bit of a pickle. It’s worth taking a quick peek at hardware you’re buying to make sure it’s IP rated. You’re looking for IP67 or IP68. IP stands for Ingress Protection – it tells you how ‘proof’ the unit is from water and solid’s entering it. IP67 is completely waterproof up to 1m deep and IP68 is safe beyond 1m (usually to 3m – if you’re unsure check with the manufacturer).
Generally speaking you don’t need to get too hung up on IP numbers – the established brands wouldn’t get very far without adhering to the rules so it’s only really necessary if you’ve picked up some hardware from a company you’re not familiar with.
Submersible lights can be mesmerisingly beautiful. They can make your water sparkle, create glowing pools and streams, even create columns of light that encase a fountain (although you’d need some pretty blooming powerful bits of kit for this).
However, it should be noted that underwater pond lighting should be used in moderation. For a stocked pond it’s important to allow your inhabitants some areas of darkness to feel safe. If you’ve not got fish in your pond it can still look very odd indeed if you have a shining pit in the garden at all hours of the night. Remember also that the more submersible lights you have the more ‘splashy’ maintenance you will need to stay on top of. If you’re the kind of person that puts off jobs if they have a few steps to the method (and that’s fine!) then maybe submersible lighting isn’t the way to go for you.
Submersible pond lighting is particularly effective with waterfalls, especially tiered systems which allow you to nestle lights in at each stage. Maintenance again comes into play here – moss and algae can grow across your lights which will, at best, obscure the light and, at worst, show up a green hue or the outlines of ‘lumpy growths’. Submersible lights will also highlight algae, dirt and leaves floating in the pond – perhaps another barrier for pond owners who may not have the time for perfect pond maintenance.
Other pond lighting – floating lights #
Perhaps the most ethereal method of pond lighting. Floating lights can provide real tranquillity and atmosphere to your landscape but again require some maintenance. Their installation is similar to submersible lights in that they are wired underwater but they are usually connected to the base of the pond via an insulated cable that runs to the base of the flotation unit. The bits you see are the decorative element and the light itself.
As well as the hard-wired options you can also have solar-powered floating lights. These tend to follow the pattern of solar-powered lights in the UK – they’re never going to be used for serious illumination – but the soft glow they provide can be very soothing and look beautiful.
Pond lighting tips #
The practical stuff; #
- Always use a transformer.
- Follow each fixture’s manual and instructions to the letter.
- Always use water proof parts. Not splash proof, or damp proof, or shower proof, or rain proof, or weather proof. Water proof.
- Make sure you’re using the proper voltage for your pond lights.
- Be extra careful with underwater lights – they should always operate off a low-voltage cable and a transformer.
- LEDs last longest.
- Make sure your bulb wattage is relevant to the job you need it to do. Deep water? Higher wattage.
The ‘fluffy’ stuff; #
- Naturally balancing your lights with the environment generally looks better than leaving them on their plastic stands.
- Sometimes, however, the stands cannot be avoided and provide the perfect solution – there is no ‘right’ or ‘wrong’ way to achieve your desired effect!
- If you’re lighting your pond you should consider lighting the environment immediately around it, too, or it will look odd.
- White light typically works best but you can use coloured filters and lenses to highlight particular areas if you wish.
Tips ‘n’ hacks #
- Solar powered lighting is great – we love solar power. However, we’re also in England. If you’re after high output for a long time then solar lights just can’t offer that power return. It can, however, create rather beautiful subtle lighting – particularly with floating lights on the waters surface.
- If you have statues, water features or ornamental plants and trees around your pond, uplighting can give your water a mirror effect. This will show the reflections of these features clearly on the pond’s surface.
- A common mistake is too much lighting or too many lights. You don’t want to pick out every detail at midnight – rather create a natural looking, gentle effect. Go easy on those lumens!
Pond lighting your way #
Your pond is a private, personal space of peace. You should be happy with your setup regardless of what you choose to put in place. If you prefer darkness then great. If you do decide to play around with lighting we really recommend doing a bit of research and trying your hand at a sketch or two. It’s amazing how you’ll see your project differently on a page – and how much clarity a few lines on the back of an envelope can give you.
It is also a big help to us. We are always here to help and advise on your pond project. But without a clear idea of the landscape you have and how you want it to be lit, we’re struggling. And no, it doesn’t matter how good the camera on your phone is!
We can’t wait to hear about your plans and see the results!
Updated on September 12, 2025


