

Sub-Total: £0.00
Complete beginners guide to Aquascaping
24 min read
Table of Contents
- Where & how big?
- What style of aquascape is best?
- Aquascape design
- Aquascaping Equipment
- Aquascaping Setup
- Step by Step guide on getting started with your aquascape
- Final considerations
- Where should I put my aquascape?
- How big should an aquascape tank be?
- Which style of aquascape is best?
- Choose your style of aquascaping
- How should I design my aquascape?
- Aquascaping Equipment
- Setting up your Aquascape
- Getting started with your aquascape
- Last things to consider
Aquascaping has become one of the fastest-growing parts of the aquatic hobby in the UK. Quite simply, it’s about spending time to create a slice of nature in your aquarium. It can be incredibly rewarding, in some cases quite literally, as aquascaping competitions are hosted around the world, with simply breathtaking scapes created by world-renowned experts.
Aquascaping can seem like a pipe-dream for many. There’s so much to consider! From setups & materials to livestock & plants. There are plenty of articles out there for fish keepers who have some previous experience of maintaining an aquarium. However, there’s not a huge amount for a new enthusiast. We know many people are captivated by underwater gardens & would love to have their own. Consider this a genuine starter guide as well as a reference point for the more experienced curator.
The journey to a completed aquascape begins long before you’re selecting plants or carefully arranging rocks. Research is everything. Here are some of the things you’ll want to consider ahead of time.
It may be best to bookmark this page – it’s a long one! We hope this can be used as a step by step guide for new enthusiasts!
Rather than litter each page with links here, there & everywhere you’ll find everything you need at the end of each section.
The following sections are broken down into;
Where & how big? #
What style of aquascape is best? #
Aquascape design #
Aquascaping Equipment #
Aquascaping Setup #
Step by Step guide on getting started with your aquascape #
Final considerations #
Where should I put my aquascape? #
Know in advance where you want your set up. Remember to keep it out of direct sunlight, away from sources of heat like radiators, and to leave enough room around it for ongoing maintenance. These sort of environments aren’t a deal-breaker, but avoid them if you can as additional work will often be required.
How big should an aquascape tank be? #
There are pros and cons to both sides of this particular coin and, as with most things, it’s often better to come down somewhere in the middle.
A small or nano (sub 10 gallon / 45 litre) tank takes up very little space, takes less set up, is cheaper to buy and to run, & doesn’t require too much maintenance. On the downside there’s less volume of water to ‘buffer’ any negative shifts in water chemistry – fish death, power outages, & overfeeding can cause problems quickly. There’s also less room for fish! You don’t want more than 10 1” fish in a tank this size.
On the other hand a big tank takes longer to set up, more time to maintain, more expensive to buy, fill, & run. However they flip the negatives of a small tank completely. There’s plenty of water volume to buffer negative shifts in chemistry, there’s lots of space for fish and for creative design.
Generally speaking a medium sized tank (15 – 40 gallon or 65 – 180 litre) will likely suit most needs. A great starting point would be either the Fluval Flex or the Ciano Aqua60 or Aqua80.
Which style of aquascape is best? #
There are a lots of styles of aquascaping once you get deeper into the hobby but the main ones to consider initially are;
- Nature (sometimes called Amano after Takashi Amano, a Japanese landscape photographer & aquascaper). This is based around the Japanese term Wabi Sabi. This is an aesthetic principle that refers to transience, asymmetry, imperfection, & recognising natural processes. The important thing to remember is the Nature style doesn’t try to mimic underwater environments, rather to mimic landscapes. By arranging elements in the tank using the golden ratio (we’ll touch on this later) and careful use of open space you can draw the eye to different areas of the tank to create anything from mountain ranges to forests.

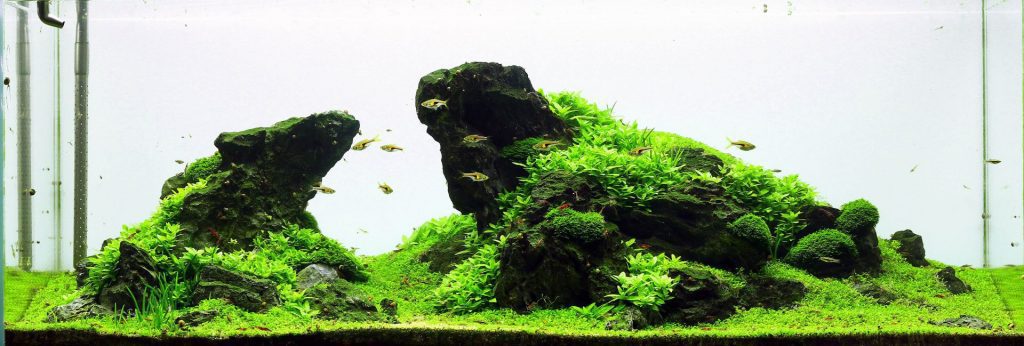
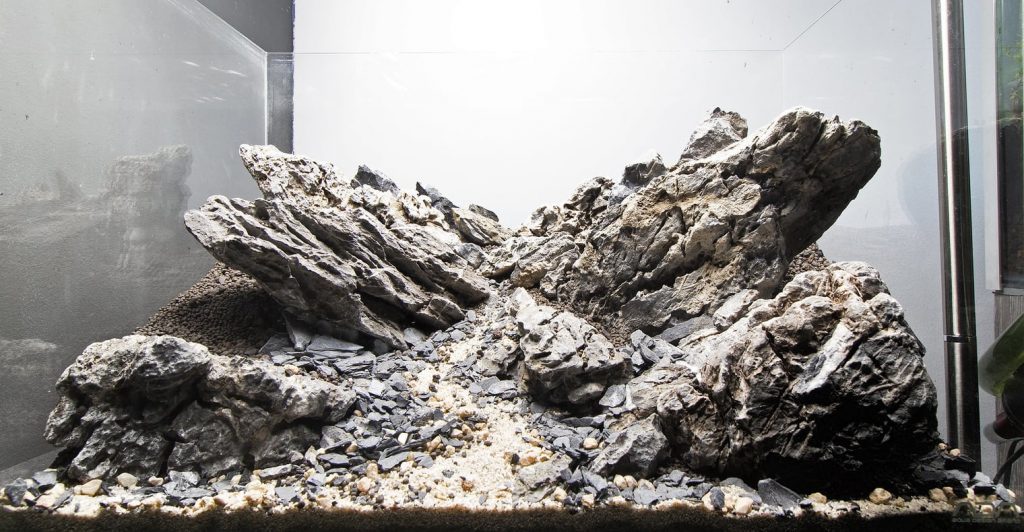
- Iwagumi. This is a focus on rocks and rock formations. Plants are included but are not the focal point so these should be kept to low lying plants like Java, Flame, or Phoenix moss. The rocks should be different sizes (with the largest stone the focal point) but should share similar colours and textures. Remember to use an odd number of rocks – an even number looks too ‘manmade’.
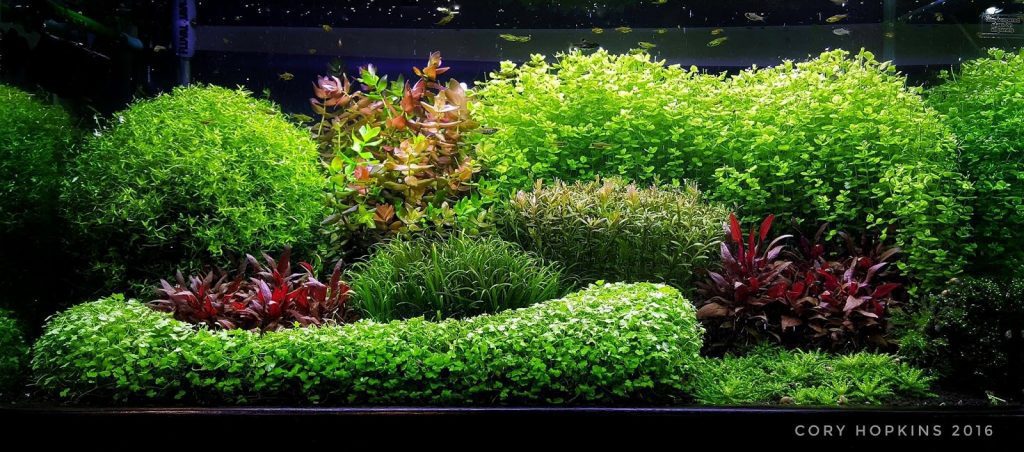
- Dutch. More of an aquatic formal garden style, much more tidy and organised. The opposite of Iwagumi, the plants are the stars of the show with around 70% of the available space often given over to lush plant life. Some ‘scapers will even terrace their substrate to add more levels and textures to their plants. Thin leaved, stemmed plants are best suited to this. Dutch style aquascapes also rely on high contrast colours, particularly red and green. The substrate should also be covered by creeping or carpeting plants. It’s important to note that this style of aquascaping requires the most maintenance so might not suit a first time ‘scaper.
- Jungle/Chaos. This style requires some planning. The aim is to go for ‘untamed’ but not messy. You’ll be going for large leafed plants (consider Amazon Swords, Banana Plants, and tall species like Vallisneria and Criniums) and where you’re going to place them. The freedom of this style means you can put them wherever you want but you must think about how quickly each plant grows and what they may overshadow. One of the challenges of this style is figuring out your lighting to ensure you get nice thickets.
Just to make it even more complicated (or interesting, depending on your point of view) you can play with floating plants, too. These can create dappled shadows across your aquascape and add real texture. It’s also important to consider your fish population to ensure your plants get enough CO2 and nutrients to thrive.
Use rock and driftwood scattered around to break up the visual lines – when placing them in the tank imagine they’ve been swept in by a tide or flood and deposited randomly, rather than carefully placed. It’s tricky and may take a few goes until you’re happy with the result.
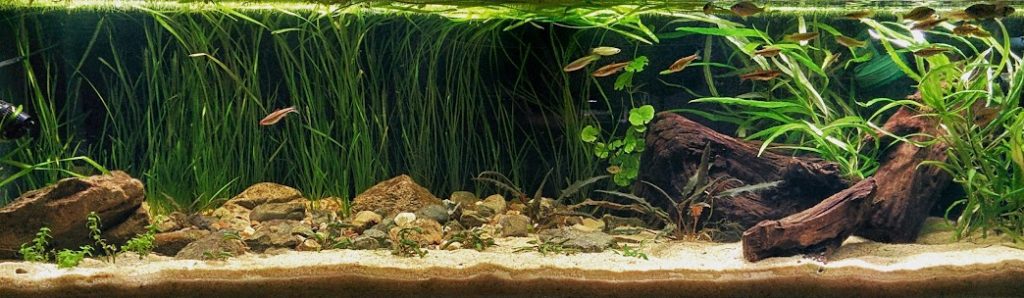
- Biotope/Biomes. This is perhaps the most diverse style of aquascaping. The idea here is to mimic nature as closely as possible. Only choosing rocks, woods, plants, fish, & invertebrates species that would be found together in the wild. The great thing about this is that they’ll all have identical water quality requirements in terms of pH, temperature, and other factors. The downside is it takes a bit of research.
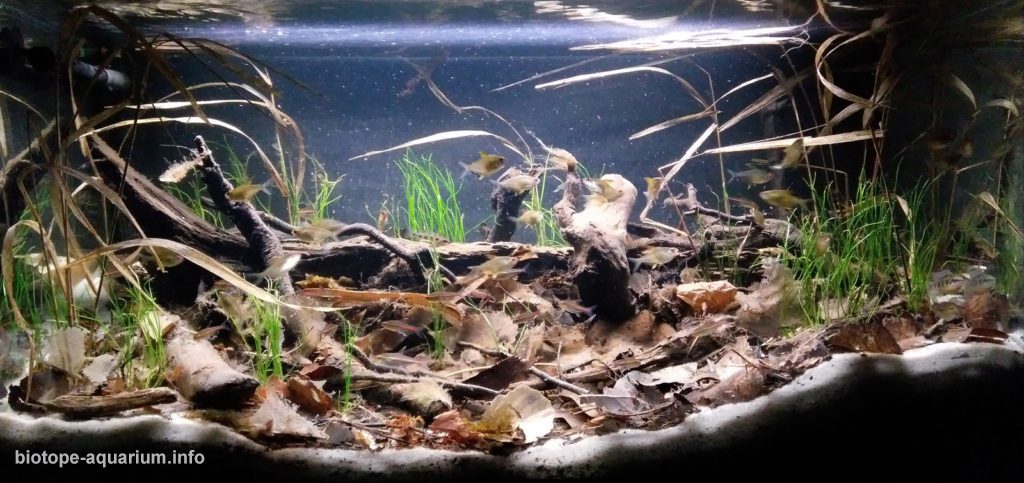
In terms of layout it’s completely down to you, the general style leans towards organised chaos.
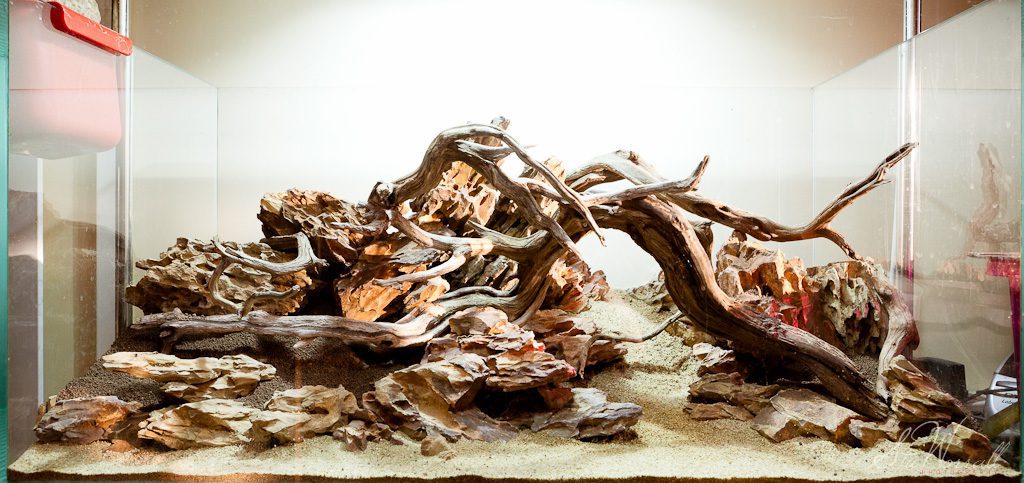
- Hardscape. A focus on just rock or wood. These can be particularly striking but are not for everyone. It’s important to do your research about how much tannin and other elements that different rocks ‘leach’ into the water. Popular rocks for aquascaping are Seiryu, or Ryuoh, stone as they have very little impact on water chemistry. Black lava rock and Ohko Dragon stone are also good choices.
Choose your style of aquascaping #
Choosing which of these styles appeals to you the most is a major part of your aquascaping journey. It will determine much of the research you need to do next.
It may benefit you to spend some time researching how these tanks develop over time. Hardscapes are static and don’t grow so if you like that aesthetic it’s an easy decision to make. However, if you’re torn between Dutch or Amano it may help your decision to watch some videos on YouTube to see established examples of these styles.
Be warned, YouTube aquascape channels can suddenly take up A LOT of your time if you’re not careful. To get a real ‘feel’ for aquascaping and what’s involved for the people who devote themselves to it take 11 minutes to watch this. It follows George Farmer, a passionate aquascape enthusiast and educators, around Florestas Submersas a giant nature aquarium in Lisbon, Portugal. It was created in 2015 by a group pf aquascapers who had all been inspired by Takashi Amano. Unfortunately that was also the year Amano died, making this exhibition something of a mecca for the aquascaping community.
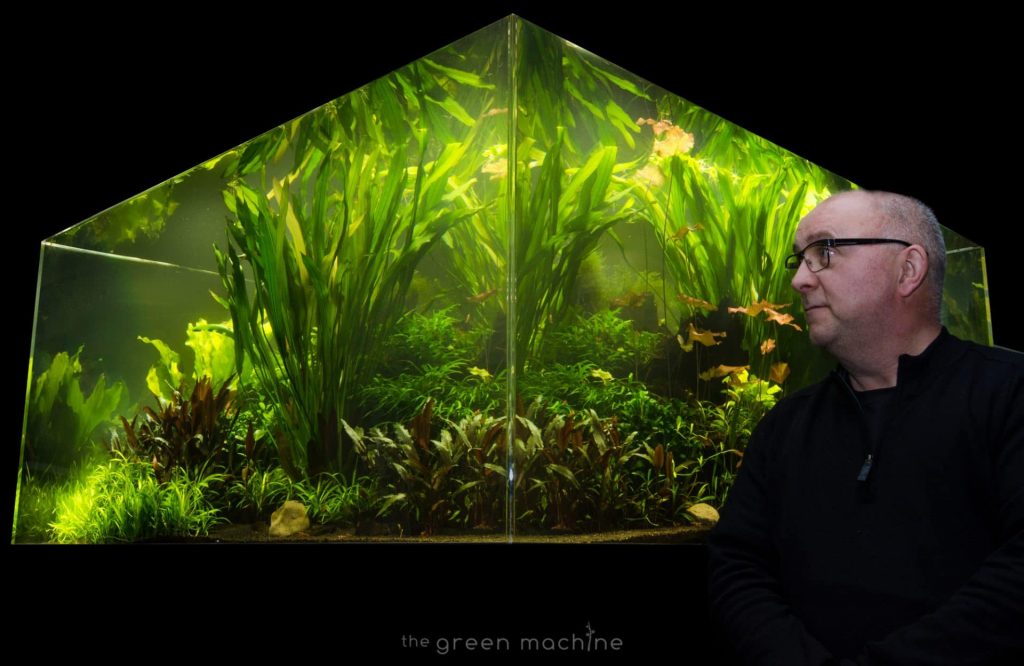
The image of the jungle style above mentions James Findley, AKA The Green Machine. He ran the largest aquascaping video channel in the world on YouTube under his green machine name until around 3 years ago. Unfortunately the Green Machine appears to no longer be trading but his beautiful creations and great advice is as useful as ever – check his content out here.
How should I design my aquascape? #
I mentioned earlier the ‘golden ratio’ – this refers to the visual representation of the Fibonacci sequence. This ‘golden ratio’ can often be spotted in the natural world – the classic example is of sunflower seeds.
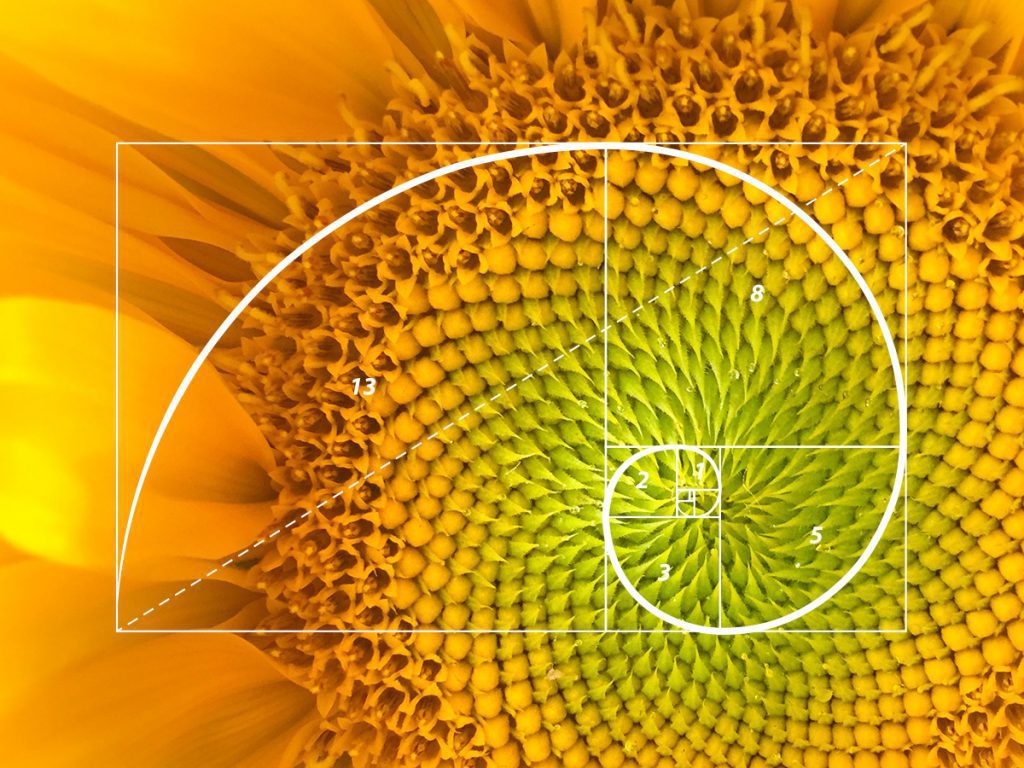
It can be mind-meltingly complex to try and explain, here are two explanations – a general one on the mathematical principle from the National Geographic, and one aquascape-specific version from a specialist source;
“It all boils down to having a rectangle whose proportions have the ratio of 1:1.618.
So, if the short side of the rectangle is 1 foot wide, the long side would need to be 1.1618 feet long. If the short side was 2 feet, the long side would need to be 3.326, and so on.
Once you have a golden rectangle, you divide it horizontally by drawing a line that creates a square and a rectangle.
For example, if your original rectangle is 3.326 X 2, you would have a square that is 2 X 2, and a rectangle that is 2 X 1.236. The 2 X 1.236 rectangle will have the same proportions as the original, since 2 divided by 1.618 is about 1.236.
You can then draw another golden rectangle inside the 2 X 1.326 one. This second rectangle will be turned 90° from the original. You can divide the second golden rectangle just like you did the first, then draw a third golden rectangle inside that.
(…) if you divide up the front glass of your aquarium using the golden ratio, you can use it as a guide so you know where to best place focal points in your aquascape.
By arranging elements according to the golden ratio, the viewer’s eye will naturally be drawn around to the different focal points again and again.
It creates a balance that is both pleasing and relaxing, two things an aquarium should always be anyway!”
modestfish.com
All clear?
Don’t worry if not. It tends to make much more sense if you grab a bit of scrap paper and draw it out as you go through the explanation.
The point is using this phenomenon will give you the most natural looking results.
If, however, that seems like a lot of faff there are some more basic principles to consider.
Concave Aquascaping #
This is where your hardscape and plants are highest at opposite ends of the aquarium sloping down to a low point just off centre. There is often a gap at the centre of bare substrate that curves towards the rear of the tank – this will give the illusion of added depth.
Convex Aquascaping #
Also known as ‘island styling’ this is the opposite of Concave Aquascaping, with your highest point being in the centre with sloping sides.
Triangle Aquascaping #
Think right angled rather than equilateral. This is where your highest point is on one side of the tank with a slope towards the opposite side. This creates great contrast between the built up space and the open water opposite. Can make for some very striking Amano styles.
And finally….Foreground, midground, background #
Same principle as having your school photo taken – tallest at the back, smallest at the front. It’s that simple.
Aquascaping Equipment #
Once you’ve settled on the size of your tank, where you’re going to put it, and what style you’d like to adopt it’s time to consider what equipment you’ll need beyond just the tank.
Water Filter #
If you already keep fish, skip this bit – you know about water filters. If you’re a newbie (welcome!) strap in, it’s time for some general learns. A water filter is essential for any set up as it does, well, exactly what you might expect. A water filter removes debris from your water. You’ll also have bacteria in your filter that play an important role in your water chemistry. Think of them as the friendly Yakult that your tank has regularly.
There are a few different types of filter; broadly broken down into internal and external. Internal filters are placed inside the tank itself whilst external filters are placed near/below/behind/outside of the tank. Obviously an internal filter will take up room you might rather have for your ‘scape, but an external filter will need inlets and outlets for water to get to it. These inlets and outlets can be made into features of your ‘scape and they also provide some water movement which is not only pleasing on the eye but important in reducing build up of bacteria or particles on the surface of the water.
The middle ground is a ‘hang on’ filter which is technically an external filter that hangs off the side of your tank, usually out of sight at the back, with short inlets and outlets.
Lights #
Often the real difference between an OK ‘scape and a breathtaking one is the lighting. This doesn’t just affect how your ‘scape looks but how your plants grow so it’s important to invest in decent lighting.
There are a few lighting options to choose from but, from our experience LED lights are by far your best bet. Most plants need a ‘colour temperature’ of between 5000 – 7500 Kelvin (k) to thrive. Natural light tends to hover around 6500k so lights around this level will give a gentle, natural look to your setup. Below 6500k will begin to look ‘warmer’ with more orange light. Think of a household bulb’s light – they’re generally 2700 – 3000k. At the other end of the spectrum beyond 7000k the light gets harsher and whiter. A good example is Xenon headlights on cars – they run around 10000k.
In the spirit of fairness we can touch on the four lighting options very quickly;
Incandescent bulbs – lease suitable. Too ‘warm’ in colour and too weak to generate the K’s you need for your plants but just about perfect for a tank full of algae. They also get incredibly hot so a splash of cold water will cause them to shatter. Into your tank.
Metal halogen bulbs – more often used for saltwater aquariums but also suitable for freshwater aquascaping. They create a distinctive ripple effect that looks especially good in shallow aquascapes mimicking environments like a river bank.
The big downside is they also get hot. Really very hot. Hot enough to make your water temperature a problem! As if that weren’t enough, all that heat generated means they take a lot of power to run, too.
Fluorescent bulbs – a good middle ground between ease, efficiency, & cost. Fixtures and bulbs are easy to source and cheap to buy. They burn out faster than LEDs but last longer than both incandescent and metal halogen, & many people prefer the quality of their light from a visual perspective.
However, they can shift in spectrum over time – becoming something of a timebomb above your tank! They are also being steadily phased out by a number of suppliers in favor of LED, due to the need for them to be disposed of on a regular basis (ideally they should be replaced every 12 months)
LED lights are the most common choice as they are affordable, light, durable, and run on little power. This makes them energy efficient and inexpensive. They run for roughly 50,000 hours before they need to be replaced, generate little to no heat, and are more efficient than any of the other options. Yes, they may be the most expensive to initially set up but their efficiency and reliability mean they’re far cheaper in the long run.
You’ll see lights installed as part of most set-ups, some will be freestanding above, some will be separate – go with whichever is easiest for you. First timers may just want the inbuilt ‘scaffold’ style and that’s perfect.
You’ll need a timer clock, too, to set your lights up with. You’ll be wanting your lights on for a set period each day, generally 8 hours. Too much can damage your plants, not enough and they could lose their colour or even stop growing completely. Play around with your timing until you hit on the right one for your set up.
CO2 #
Whilst not strictly necessary it is recommended to use extra CO2 for better colours and generally healthier plants. Plants breathe CO2 in the same way we breathe oxygen so providing enough keeps them at their best. There is naturally occurring CO2 in the environment of your ‘scape anyway but ensuring good levels is a sensible precaution.
CO2 is provided via gas bottles. These can either go through a diffuser directly into your water or you can introduce the gas via an external water filter (meaning you wouldn’t need a diffuser). A CO2 bottle for a nano aquarium would need replacing roughly once a month. Bigger tanks may require bigger, heavier, refillable CO2 bottles so storing/hiding these must also be taken into consideration.
The CO2 system should also be on a timer to release gas around the times the LED lights are on. This is when the plants will be photosynthesising & will need it. You’ll also need a CO2 indicator to go along with this so you can monitor how much CO2 you have/need.
Fertiliser #
In many aquascapes your setup will be so heavily planted your substrate may struggle to maintain them in the mid-long term. A weekly dose of something like Easy Life Profito will provide them with all the trace elements your plants need. Something to bear in mind, particularly if you’re ‘going dutch’, is red plants may also need an additional iron fertiliser to show at their best.
If you don’t intend to use CO2 then consider using a 2 part fertiliser system such as Profito combined with Easy Carbo. Easy Carbo should be administered daily and provides plants with a liquid source of organic carbon. Imagine that plants need organic carbon in the same way we require carbs. A CO2 system is the plant equivalent of a bowl of pasta, Easy Carbo is like giving them Lucozade Sport. You can use either or both – it depends how athletic your plants are!
Aquascaping tool set #
You’ll need a set of tools to properly set up and look after your ‘scape. Plant tongs, plant tweezers, plant scissors, a thermometer, & plant weights are all recommended. A gravel cleaner pump is recommended (best £8 you’ll ever spend) or there is the gravel vac kit from Fluval.
If you’re going for a marine aquascape you’ll need a coral fragging kit. Although, chances are, if you’re propagating a reef you don’t need a beginners guide – no matter how good it is!
Any set up will likely need epoxy or glue to hold rocks in place or or stop driftwood drifting off. It may sound obvious but rocks are heavy. Even a small rockfall could crack a tank and then you really would have a situation on your hands. An inquisitive cichlid or dragon wrasse can find themselves in a spot of bother from falling masonry due to them digging around your rocks if you haven’t secured them properly.
If you are building rocks on top of each other, always base your shapes on something gravity will agree with. Just because you have some glue don’t make fantastical shapes that are unsteady.
Setting up your Aquascape #
Aquascaping Substrate #
The first thing to do when creating your physical aquascape is to put in your substrate. Most aquascapes are heavily plant oriented so giving some thought to their growing environment makes a lot of sense. If you’re a hardscape enthusiast and won’t be bothering with plants you can pretty much whack in whatever you want. Just remember to give some thought to the needs of any potential future inhabitants.
If, however, you’re after the rich, lush, garden-eques quality of the true aquascape you’ll need to avoid sterile substrate. Sand and gravel offer very little by way of nutritional value to your plants and will make it difficult to establish healthy, consistent growth.
Using a ‘complete’ substrate like Seachem Fluorite or AquaGro means your plants will have all they need. Also you won’t need to replace the substrate for the lifetime of the tank.
Aquascaping hardscape – rocks ‘n’ stuff #
A rule of thumb when it comes to hardscape is that beginners should stick to 1 type of rock and 1 type of wood. This reduces the complications you may run into when it comes to ‘leaching’.
Rocks and woods will leach things like tannins and carbonates into your water. This will result in things like increasing the ‘hardness’ of your water. Knowing which rocks and woods do this, and to what degree, is our responsibility – there’s a lot to remember!


The best thing you can do is to remember a few things;
Rocks; #
- Always wear gloves when handling your rocks (keeps your oils etc off them and, therefore, out of your water).
- Give them a thorough wash when you get home.
- Keep them submerged in water for a few days away from your tank. This means the worst of the leaching is done before you introduce them to your ‘scape.
Driftwood; #
Often woods used in aquascaping are naturally buoyant. You can use aquarium silicone sealant to fix them to a piece of rock as an anchor if needs be. Don’t worry about the aesthetics, this can easily be covered by substrate. If you’re after some other methods here are some simple, general rules you can follow.
- Give it a good scrub in water when you get home to remove any excess dust or dirt.
- Curing – some driftwoods will sink straight away, others won’t. The simplest way of getting it all at the bottom is to make sure your driftwood is fully saturated. The only downside is that this can take 2 weeks! Submerge your driftwood in a bucket completely. Then change the water every 4 day. The wood will be leaching tannins into the water and you want them gone. They’re what’s turning the water brown. When the water hasn’t looked like tea for a few days you’ll know you’re good to go.
- You can also boil your driftwood to remove the tannins and this is much faster than curing. It also has the added benefit of sterilising your driftwood. You’ll need to boil it for around 2 hours to fully sterilise it.
- Be aware that even after the most careful preparation woods can still leach tannins. Just stay on top of it and treat any extra released tannins with activated charcoal or a chemical filter. Left in there too long they will begin to lower the pH of your tank, making it more acidic.
If this is all blowing your mind and you’d like to start simple then do that. Use ornaments that just look like beautiful rocks and driftwood. It may be better to play around with that option for a few ‘scapes before biting the bullet on a serious build. It will also allow you to play around with colours and textures without having to figure your water chemistry out on top!
Picking your aquascaping plants #
Choosing which plants you want in your setup will be determined by a few factors; what’s visually appealing to you, plants that require similar water parameters, how much upkeep they require, your available tank space, your budget and, sadly, availability.
For that reason I won’t go into exhaustive detail here (or any real detail at all) as many of those factors mentioned above can’t be accounted for in a post like this. Just keep in mind the background, midground, foreground rule from earlier and be sure to be mindful of the growth rates and heights of your selected plants. Then come in store and have a chat with us!
Nobody has ever aquascaped in a rush. Taking your time to properly research, select, build, and establish your ‘scape is the joy of it.
Getting started with your aquascape #
Some top tips for getting your ‘scape rocking and rolling.
- Start dosing your substrate with fertiliser straight away. This supplements the nutrient reserves already in the plant. It also helps prevent algae by ensuring plants are using up all the nutrients available in vigorous growth.
- Turn your CO2 on high enough and early enough. This could be 2,3, or 4 hours prior to the lights coming on – play around with it to find the best balance for your setup.
- You’ll need to stay on top of your water changes. These will generally be a 50% change every week. When setting up we recommend changing the water every other day for the first two weeks, then every 3 days for weeks 3 and 4. This practise removes ammonia and organic waste as, in the early stages, the filter and substrate aren’t established enough to deal with all the waste.
- For the first two weeks your lights should be on for 6 hours per day instead of 8. After two weeks or so increase the time to 8 hours. This should help your plants become accustomed to the conditions.
- As well as the time spent under the lights the intensity should be altered if possible. Having your lights at 50% intensity to begin with and increasing by 10% every 5 days until running at 100% should both limit algae growth and ensure your plants are using the nutrients present – not being shocked by harsh lighting. We reckon it would put you off your dinner too, being under strong lighting all of a sudden all of the time!
There are also some products you should consider ‘must-haves’.
- Seachem Stability – Removal of ammonia & organic waste – helps establish filter and natural biological filtration quickly. Dose from day one until the bottle runs out.
- Seachem Purigen – in your filter – great at removing waste & ammonia.
- Seachem Clarity – to help keep that water clear!
Last things to consider #
You’re almost there – you’re almost full ‘aquascaped up’. The last things to remember.
Water #
Four things to remember about your water before you go sloshing it into your aquascape;
- Make sure the water you’re using is free from harmful chemicals like chlorine.
- Make sure your water is up to the right temperature before potentially dumping cold water all over tropical plants.
- Plant your aquatic plants with water in the environment – this will prevent any potentially fatal ‘drying outs’.
- Pour your water in slowly and in an indirect way to avoid kicking up lots of debris and splashing. Try having it running down the side of your tank slowly or direct the flow down your hardscape to break up the surface tension a bit.
Aquascaping brings joy and relaxation to so many around the world, we hope this article goes some way to introducing you to its many pleasures. If you have any questions at all please do comment on this article or come in store to speak with us directly!


